Whole document tree
| GNOME 1.4 User's Guide | ||
|---|---|---|
| <<< Previous | Nautilus User Manual | Next >>> |
Customizing Nautilus
You can customize Nautilus in many ways so that its appearance and behavior meet your needs and taste. This section explains how.
Setting Your User Level
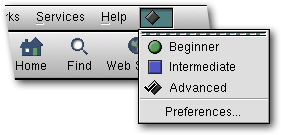
When you first lanched Nautilus, you were asked to choose your user level: Beginner, Intermediate, or Advanced. The user level dictates the amount of detail you see while navigating your files and folders:
Beginner: For users who have no previous experience with Linux or GNOME.
Intermediate: For users who have had some experience with Linux or GNOME but don't want to see every detail of their system.
Advanced: For users who like to see every detail of their system, including the ugly stuff.
To change your user level, open the preferences menu and choose the level you want.
One way to see the difference between the levels is to go to your home directory and then compare what you see as you select each level in turn. Be sure to return to the level with which you're comfortable when you're done.
Setting Preferences
Several preference settings that you can adjust are located in the Preferences dialog box. The available settings depend on your user level - intermediate and advanced users have access to more settings than beginners.
The preference settings adjust the appearance of Nautilus, the behavior of files and folders when you view and click them, the type of searches performed when you click the Find or Web Search buttons, and more.
To open the Preferences dialog box use the preferences menu, shown here.
To customize preferences:
Open the preferences menu and choose Preferences.
From the left column in the Preferences dialog box, choose the type of settings you want to adjust (for instance, Icon & List Views).
Adjust each group of settings as desired.
When you are finished setting preferences, click OK to close the window.
Showing and Hiding Bars
The Nautilus window shows these bars by default:
sidebar
toolbar
location bar
status bar (at the bottom of the window)
You may want to hide one or more of these bars to save space on your screen.
To hide and show bars:
Open the View menu and click one of the options in the second section. For instance, to hide the sidebar, click Hide Sidebar.
To see the bar again, open the View menu and choose one of the Show options.
Note: If you hide a bar in your Nautilus window and then open another Nautilus window, the bar is not hidden in the new window. To specify which bars should be hidden or displayed in new windows:
Open the preferences menu (shown below) and choose Preferences.
In the left column of the Preferences dialog box, click Appearance.
In the Views section, deselect any bars you want hidden in new windows.
Click OK to close the window.
Choosing File Layouts
File Layout in Icon View
To change the layout of files you're viewing, open the View menu and choose Lay Out Items. Then choose how you want the files arranged.
| Manually | You can drag icons to arrange them as you like. |
| By Name | The files appear alphabetically by name. |
| By Size | Files are displayed from largest to smallest. |
| By Type | Files are arranged in groups, such as text, image, and so on. All folders are grouped. |
| By Modification Date | The most recently modified files appear first. |
| By Emblems | If you've added emblems to icons, the files are grouped according to emblems (files without emblems are at the end). |
| Tighter Layout | Icons are closer together. |
| Reversed Order | Reverses the order for the option you've chosen. |
File Layout in List View
In list view, you can change the layout of files by clicking the column headings. For instance, to arrange files by type, click the Type column heading. Click again to reverse the order.
Changing Themes and Backgrounds
You can customize the decor of your Nautilus window by choosing an overall theme and by changing the background color or image of specific objects.
Choosing a New Theme
Open the Edit menu and choose Nautilus Themes.
Choose a theme. The appearance changes immediately, so you can see how the theme looks.
When you're finished, click Done.
Changing Backgrounds
Open the Edit menu and choose Backgrounds and Emblems.
In the Backgrounds and Emblems dialog box, choose Patterns or Colors.
Drag a tile to a part of the Nautilus window. For instance, change the color of the sidebar by dragging the yellow tile. To restore the orginal setting, drag the Reset tile.
When you're finished, click Done.
Note: The Backgrounds and Emblems dialog box also lets you drag emblems to attach to individual file and folder icons.
Adding and Removing Custom Backgrounds
If your user level is set to Intermediate or Advanced, you can add and remove backgrounds and colors in the list of customization choices.
Any image file can be a background. To add a background to the customization choices:
Open the Edit menu and choose Backgrounds and Emblems.
In the Backgrounds and Emblems dialog box, choose Patterns
Click Add a New Pattern.
Locate the image file you want to add to the set of background patterns.
Select the image file and click OK. The image is added as a new tile.
To add a new color to the background color choices:
Open the Edit menu and choose Backgrounds and Emblems.
In the Backgrounds and Emblems dialog box, choose Colors.
Click Add a New Color.
On the color wheel, click the color you want to use and click OK.
Type a name for the color and click OK. The color is added as a new tile.
To remove a custom pattern or color from the set of pattern and color tiles:
Open the Edit menu and choose Backgrounds and Emblems.
In the Backgrounds and Emblems dialog box, choose Patterns or Colors.
Click Remove a Pattern or Remove a Color.
Any patterns or color tiles you have previously added are displayed. Click the one you want to remove.
Repeat steps 3 and 4 for any other pattern or color tiles you want to remove.
Click Done.
Note: If you remove a pattern or color tile that you have applied as a background for an object, the object continues to display that pattern or color.
Customizing Icons and Icon Captions
Icons appear with information in their captions - normally the directory name and number of items for directories and the name and size for files. If you zoom in for a closer look at icons, more information appears.
Customizing Icon Captions
You can customize the information below icons - the icon captions. Although the file name must always appear first, you can specify which other information to show and change the order of the information.
Open the Edit menu and choose Icon Captions.
Click the first button and choose from the list. The information you choose will be the first thing shown below an icon, after the file name.
Repeat step 2 for the second and third buttons.
When you are done customizing icon captions, close the dialog box.
Note: To see the entire icon caption, you may need to zoom in (click the + symbol in the location bar).
Customizing Icons
You can change the icon for an individual folder or file, giving it a custom icon:
Click the icon for the file or folder.
Open the File menu and choose Show Properties.
In the Properties dialog box, click Select Custom Icon.
Find and select the image you want to use as a custom icon; then click OK.
Close the Properties dialog box.
You can also drag an image file to an icon you want to customize:
If you have a tab (Tree, Notes, History, or Help) open in the sidebar, put it away so that you can see the icon you want to customize. (To put away a tab, click it.)
Double-click the item you want to customize so that its icon is displayed in the sidebar.
Drag an image to the icon. The image replaces the icon.
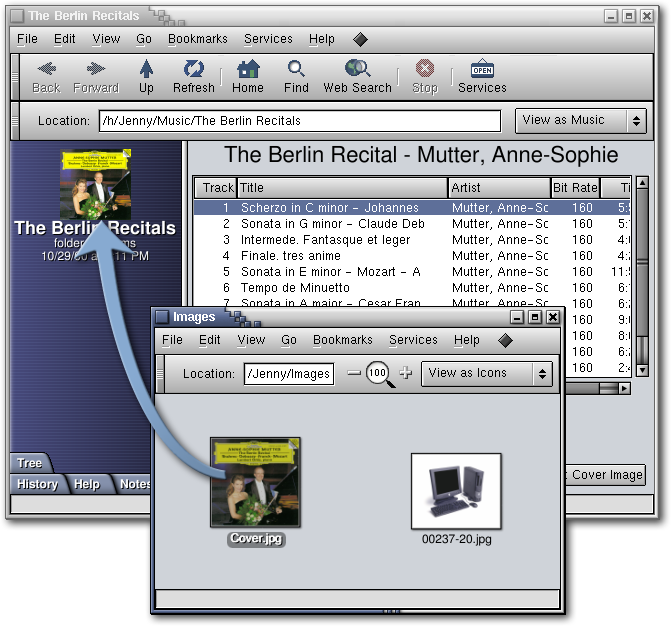
Tip: You may want to work with two Nautilus windows when you customize an icon. Open the File menu and choose New Window. You can drag an image from one window to the icon you're customizing.
Adding Emblems to Icons
Emblems let you tag individual files as Urgent, Favorite, and so forth. To add an emblem to an icon:
Make sure that the folder or file to which you want to add an emblem is visible in the Nautilus window. You can be in Icon or List view.
Open the Edit menu and choose Backgrounds and Emblems.
In the Backgrounds and Emblems dialog box, choose Emblems.
Select an emblem and drag it to the icon you want to customize. To remove emblems, drag the Erase emblem to the icon.
Click Done.
You can add as many emblems as you like.
 | Try this |
|---|---|
Use emblems to organize your files. |
Attach Oh No! or Urgent emblems to the files that need immediate attention; then open the View menu and choose Lay Out Items By Emblems. The files with emblems are displayed at the top in icon view and first in list view.
If you use emblems, you can also search by emblem.
Choosing a Desktop Background
You can change the color of your desktop, or give it new "wallpaper." Do this:
Right-click anywhere on the desktop (outside a window), and choose Change Desktop Background from the pop-up menu. The GNOME Control Center opens with the Background Image section displayed.
To use an image as the background, choose an item from the pop-up menu under Wallpaper or click Browse to find an image file on your computer.
If you're using an image as a background, choose the effect you want: Tiled, Centered, Scaled, or Embossed Logo. Click Try to see how the styles look.
To use a color as the background, click the color tiles next to Primary Color and Secondary Color and choose colors from the color wheel.
From the pop-up menu under Color, choose Solid, Horizontal Gradient, or Vertical Gradient. Click Try to see how the gradients look.
Be sure that Use GNOME to set Background is selected.
Click OK; then close the GNOME Control Center.
| <<< Previous | Home | Next >>> |
| Managing Your Files and Folders | Up | Choosing Applications to Handle Files |