Whole document tree
| The GNOME Panel Manual | ||
|---|---|---|
| <<< Previous | Next >>> | |
Adding, Moving, and Removing Panel Objects
Moving objects
To move any object in a Panel to a different location, just hold down the middle mouse button and drag it to the new location. Or, you can right-click on it and choose Move, then move the mouse to the new location and press any mouse button to anchor it in its new position. You can move it to a different location on the same Panel, or to a different Panel. If in the course of this movement it hits other objects, the behavior depends on the global preferences (see the Section called Panel objects Tab): the object you are moving can switch places with other objects, "push" all objects it meets, or "jump" over all other objects without disturbing them. You can also override the default behavior by holding the Shift button (for "push" mode), the Ctrl button (for "switched" mode), or the Alt button (for "free" mode, i.e. jumping other objects without disturbing them) while moving the object.
Removing objects from the Panel
To remove an object from a Panel, right-click on it and choose Remove from panel from the pop-up menu.
Adding objects to the panel
By default, the GNOME Panel contains only a few basic objects, such as the Main Menu. However, there are many Panel objects you can add to it. For example, every menu item in the Main Menu or its submenus can be added to a Panel as an application launcher. GNOME also has many applets that can be added to a Panel, ranging from Printer Applet, which prints files which you drag and drop onto the applet, to Wanda the Fish. There are many additional GNOME applets and applications available on the Internet.
- Applets
To add an applet to a Panel, right-click on the Panel and select Panel->Add to panel->Applet. This will show you a menu of all the applets on your system, divided into categories; choosing any applet from this menu will add it to the Panel.
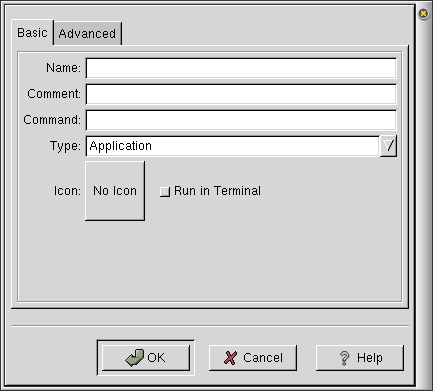
- Application launchers
To create a new application launcher, right-click on the Panel and select Panel->Add to panel->Launcher. This will open the Create Launcher dialog, shown below. In this dialog you should enter a name for your launcher, a comment, and the command line to launch the application. This dialog is virtually identical to Launcher Properties dialog. See the Section called Launchers for a more detailed description.
You can also add any application in the Main Menu or application launcher on your desktop to a Panel. To do so, use the first mouse button to drag the object onto the Panel. Be careful to drop it in an empty space on the Panel and not on any existing object: for example, if you drop it on the Printer Applet, it will be printed. You can also right-click on an item in the Main Menu and select Add this launcher to panel. After this, you can change any options for that launcher by clicking on it with the right mouse button and selecting Properties....
- Menus
To add a menu, right-click on the Panel and select Panel->Add to panel->Menu. This gives you a choice of the Main menu, Programs menu, and Favorites menu.
You can also add the Main Menu or any its submenu as a new menu to the Panel by right-clicking on the menu title (the top line of the menu, separated from menu items by a thin line) and selecting Add this as a menu to the panel.

Creating Menus By Hand Advanced users can also create new menus manually. To do so, you need to know that internally, GNOME represents a menu by a directory, with menu items presented by files of special type (.desktop files — these files also represent the application launchers), and submenus presented by subdirectories. For example, the Favorites menu corresponds to the directory ~/.gnome/apps (where ~ denotes your home directory), and the Programs menu corresponds to the directory /usr/share/gnome/apps. Thus, you can create a new directory, using the GNOME File Manager, drag and drop there any .desktop files from any other directories you might have (for example, from /usr/share/gnome/apps) or from the desktop, and then drag and drop this directory from the File Manager window to the Panel. This will add this directory as a menu to the Panel.
After you have added a menu to your Panel using any of the methods described above, you can modify its properties (for example, add new items to this menu or change the icon used by the menu), as described in the Section called Menus.
- Drawers
To add a new empty drawer, select Panel->Add to panel->Drawer. Then right-click on the drawer and select Properties... to change its properties (for example, the icon it uses). You can add new items to this drawer in the same way as you add items to a Panel: all the methods for adding new objects to the Panel described in this section will also work for adding new items to a drawer.
You can also add the Main Menu or any of its submenus to the Panel as a drawer by right-clicking on the menu title and selecting Add this as drawer to panel.
- Swallowed application
To add a swallowed application to your Panel, select Panel->Add to panel->Swallowed app. This will open the Create Swallowed Application dialog. For detailed information on using this dialog, see the Section called Swallowed Applications.
| <<< Previous | Home | Next >>> |
| Special Panel Objects | Creating, Moving, and Removing Panels |