Whole document tree
| Mango Peeler User's manual Last update : September, 3rd 2001. How to create maps (quickly and easely) for The Blue Manogo Quest. |
|
Table of contents
1. Creating a new map
1.1. Linux users
1.2. Windows users
2. Loading an existing map
3. Editing a map
3.1. Texture mode : using the texture panel
3.1.1. Placing textures
3.1.2. Deleting textures
3.2. Bonus mode : all the secrets of the bonus panel
3.2.1. Placing bonus
3.2.2. Changing parameters
3.2.3. Deleting bonus
3.3. Special items : discovering the 'Others' panel
3.3.1. Player's start position
3.3.2. Winning post
3.3.3. Placing Shmolluxes' Huts
3.3.4. Teleports
3.3.5. Time limit
3.3.6. Number of lives
4. Saving a map
1. Creating a new map
1.1. Linux users
You have to use the following arguments on the command line :
mangopeeler [-s size] [-w world] filename.shx
- size : can be 14, 20 or 28 (14 stands for 14x14 and so on...).
- world : 0, 1, 2 or 3.
0 is the Industrial world,
1 is the Carrabean world,
2 is the Mines world,
3 is an undefined world. (will be defined soon).
- filename : it will be saved in your personal mangoquest's maps folder : ~/.mangoquest/maps
1.2. Windows users
Use the launcher (MangoLauncher) to easily create a new map.
(but you can also use the command line arguments if you want).
The maps are saved in the customs\maps folder.
2. Loading an existing map
From command line : mangopeeler filename.shx
If you don't specify the filename, MangoPeeler will load either ~/.mangoquest/maps/default.shx for linux users, or customs\maps\default.shx for windows users.
If you specify a filename, Mangopeeler searches in the following paths in this order :
* linux users :
- if you specify a complete and correct path and filename, it uses it
- if you only specify a filename or an invalide complete path :
- it looks in the current working directory
- it looks in your personal BMQ folder (~/.mangoquest/maps/)
* windows users :
- if you use the loader, it use the selected file
- else :
- it looks in the current directory
- it looks in the custom maps directory (customs/maps)
3. Editing a map
Now you've launched MangoPeeler, it's time to work.
This is a quick description of MangoPeeler's interface :
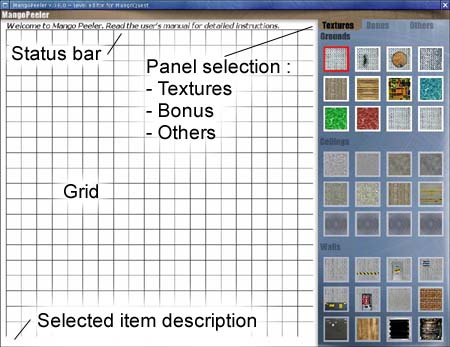
To select a panel (Textures, Bonus and Others), left-click on it. It will switch to the dedicated grid.
To select an item, left-click on it. A red square appears around it.
3.1. Texture mode : using the texture panel
The grid represents the map on top view (as if you flew over it). Each square must contain :
- either a wall texture,
- or a ground texture and a ceiling texture.
In order to simplify the map's representation, there are two separate levels of vision :
- if you select a wall or ground texture, you see the floor-level grid, and you can't see the ceiling.
- if you select a ceiling texture, you only see the ceiling and wall textures, and you can't see the ground.
Except if you know what you are doing, you have to close the map with walls.
3.1.1. Placing textures
Once you've selected a texture, left click on a square on the grid to place it. For placing large amounts of a same texture, simply left-click on the grid and drag your mouse to make a grey rectangular selection.
If you place a texture on an existing texture, the new texture replaces the old one.
Warning :
- if you erase a ground/ceiling texture with a wall, it will also erase the ceiling/ground texture.
- if you erase a wall texture with a ground texture, don't forget to add a ceiling texture on that square.
If you want to place ground textures without erasing the walls, press the CTRL key while left-clicking.
3.1.2. Deleting textures
The deleting process is the same that the placing process, except you have to use the right mouse button. You can also do rectangular selections (with blue color). However, there are some special rules :
- you can only delete textures that are in the same category that the selected item. E.g. : if you've selected a ground texture, you can only delete ground textures.
- when you erase while pressing the CTRL key, you only delete the textures matching the selected item.
3.2. Bonus mode : all the secrets of the bonus panel
Once in Bonus panel, a new grid superimposes the floor-level grid, as shown below :
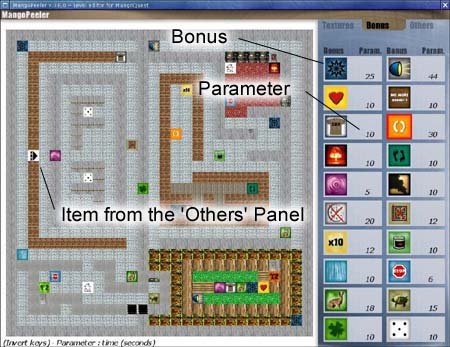
As you can notice, you also see special items from the Others panel (player's start position...). However, you can't erase them while in Bonus mode.
3.2.1. Placing bonus
Select a bonus by left-clicking on the item.
The number next to the bonus picture is the bonus parameter (generally, it is the bonus time effect in seconds. Refer to the description here or in the "Selected item description" bar).
Left-click on a square containing a ground texture to place the bonus and register its own parameter.
3.2.2. Changing parameters
To change the parameter's value of the selected item before placing it, press the UP and DOWN arrow keys. It will increase it or decrease it by 1 unit. You can use the SHFT key to increase or decrease by 10 units.
Each bonus has its own parameter. E.g. : if you place the Speed bonus with parameter 20, change the parameter to 30 and place another Speed bonus, the first one will keep its value (20).
3.2.3. Deleting bonus
Right click on a bonus to erase it.
3.3. Special items : discovering the 'Others' panel
The grid associated to the Others panel is the same that the Bonus grid.
To change parameters, use UP and DOWN arrow keys.
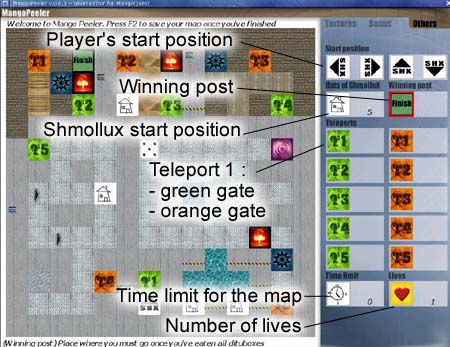
3.3.1. Player's start position
You can place only one start position for the player. This is where you will appear when you begin the game or when you respawn after being eaten.
You can choose between 4 different directions.
3.3.2. Player's winning post
Placing a winning post is optionnal. The winning post is the square where the player must go on where he has eaten all the dituboxes on the map in order to finish the map.
3.3.3. Placing Shmolluxes' Huts
N.B.: A Shmollux is a nasty guy who wants to kill you.
In The Blue Mango Quest, there can be several Shmolluxes start positions. In fact, a Shmolluxe belong to a tribes. What you can place is a Hut (the tribe's vault) containing a number of Shmolluxes.
When a Shmollux dies, he return to his own hut.
The parameter of a hut is the number of Shmolluxes that are in it.
3.3.4. Teleports
A teleport is a combo of two gates.
If you choose to place teleports, you must place the two gates (the green one and the orange one).
There can be up to 5 teleports (that is, 10 gates). In The Blue Mango Quest, teleports work in the 2 ways : each gate is either an entrance, or an exit.
N.B.: Shmolluxes can't use teleports.
3.3.5. Time limit
This is a special item : it can't be placed in a square. It is an attribute of the map : it is the time the player has to finish the map.
The time is given in seconds.
A time limit of 0 means that there is no limit.
3.3.6. Number of lifes
This number represents the number of lives that the player owns at the beginning of the map.
(1 <= Number of lives <= 5)
4. Saving a map
Press F2 to save your map. Look at the Status bar to read the result of the process.
Warning : your map must be complete.
- player's start position and at least a Shmollux Hut are requiered.
- there must be a texture on each square ( [ground and ceiling] or [wall] ).