Whole document tree
| GNOME 1.4 User's Guide | ||
|---|---|---|
| <<< Previous | The GNOME Panel | Next >>> |
Launchers
Launchers are buttons which reside in your Panel and start an application or execute a command when clicked. A launcher can use any icon and has a customized tooltip to display a message when the cursor is passed over the launcher.
You can change a launcher's properties, such as the icon it uses and its name, by right-clicking on the launcher and selecting Properties... from the pop-up menu. This brings up the Launcher properties dialog, shown in Figure 7. A similar dialog is used when you create a new launcher (see the section called Adding objects to the panel). Note that internally GNOME makes no distinction between menu items and launchers: these are just different representations of the same thing. You can place any menu item on a Panel, and it will appear as a launcher. Therefore, all the information below applies equally to launchers and menu items.
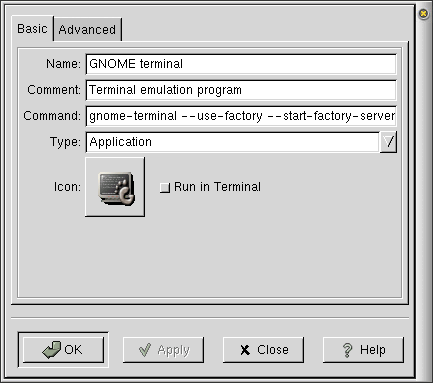
The Laucher Properties dialog has two tabs: Basic and Advanced. In the Basic tab, you can set:
Name — this is the application name, for example, GNOME terminal. This name will be used if you later put this launcher in a menu.
Comment — this is a brief explanation of what this application does, for example, Terminal emulation program. This will be used for tooltips.
Command — the actual command that runs the application, for example, gnome-terminal.
Type — should be Application; do not change it unless you want to create something other than an application launcher.
Icon — this is the icon which will be used to represent the launcher in the Panel. If no icon is specified, a default icon will be used. To change the icon, just click on it to launch the icon browser.
Run in Terminal — this specifies whether the application should be run inside a terminal. If the application doesn't create any windows on its own, check this button. If you are unsure, leave it unchecked.
The Advanced properties tab is shown below. It is intended for advanced users; most of the time, you will not need to change any of these settings.
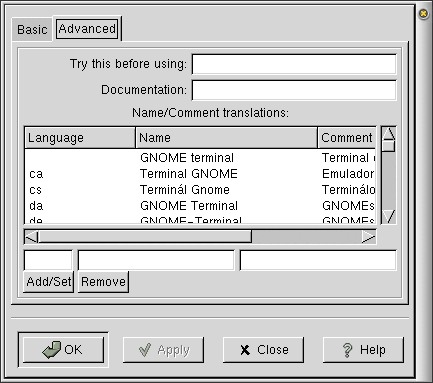
In the Advanced tab, you can set:
Try this before using — you can enter a command here, and GNOME will check if this command can be executed. If the command cannot be successfully executed, the launcher (or menu item) will not be shown even if you added it to a Panel or menu. It is mostly used by people preparing GNOME distributions. For example, the default GNOME Main Menu contains an item for the TkRat e-mail program, but you will only see this item if you have TkRat installed on your system.
Documentation — currently not used.
Name/Comment translations — here you can set translations of the Name and Comment to other languages. For example, for GNOME Terminal, the translations to Spanish (es) are name: Terminal UNIX de GNOME and comment: Emulador de terminal GNOME. This means that if a user sets his language to Spanish during login (this can be done by selecting the desired language from Languages menu of the GNOME Display Manager when logging in) he will see Terminal UNIX de GNOME in the menu and Emulador de terminal GNOME as the tooltip. The actual command that runs the terminal is unchanged.
To add a new translation, enter the language 2-letter code and translations of Name and Comment fields in the empty fields under the list of current translations, and press the Add/Set button. To change one of existing translations, select the row from the list, edit the fields you want to change, and press the Add/Set button. To remove one of existing translations, select it in the list and press the Remove button.
You can find the list of all languages supported by GNOME along with their 2-letter codes in GNOME Frequently Asked Questions.
All of the changes you make in the Launcher Properties dialog will take effect when you press Apply or OK. Pressing OK closes the dialog; pressing Apply will allow you to continue editing.
| <<< Previous | Home | Next >>> |
| Menus | Up | Applets |