Whole document tree
| GNOME 1.4 User's Guide | ||
|---|---|---|
| <<< Previous | The GNOME Panel | Next >>> |
Global Panel Preferences
To start configure the behavior of all of your Panels, select Panel->Global Preferences from the Main Menu.
This will open the Global Panel Preferences dialog. (This dialog is a component of the GNOME Control Center). With this dialog you can control many properties shared by all of your Panels.
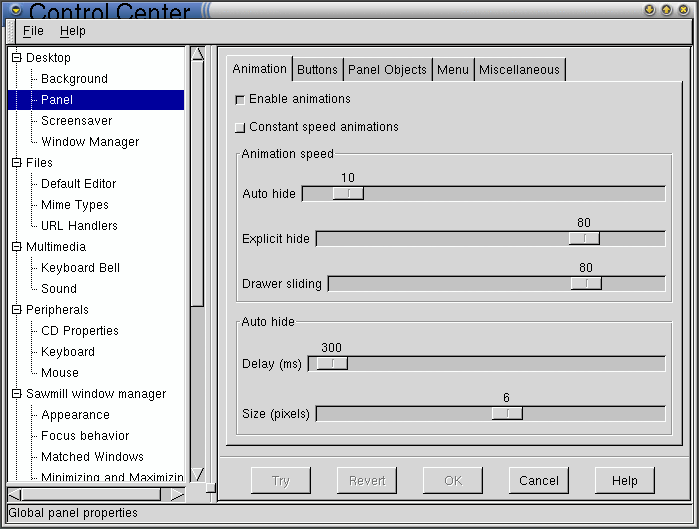
Figure 19. The Global Panel Configuration Dialog
The Global Panel Configuration dialog contains the following five tabs: Animation, Buttons, Panel Objects, Menu, and Miscellaneous. Each of these tabs is explained below.
Animation Tab
Enable animations — This allows Panels and drawers to animate as the hide and unhide.
Constant speed animations — By default, the animations start slowly, but then accelerate. If you enable this option, the animations will not use any acceleration.
[Animation speed] Auto hide — This controls the speed of animation for any Panel which is set to hide automatically when the mouse leaves the Panel. The slowest setting is 1, and the fastest is 100.
[Animation speed] Explicit hide — This controls the hide speed when you press a Panel's Hide Button. The slowest setting is 1, and the fastest is 100.
[Animation speed] Drawer sliding — This controls how fast a drawer menu will raise when you press a drawer button on a Panel. The slowest setting is 1, and the fastest is 100.
[Auto hide] Delay (ms) — If you have a Panel set to minimize automatically after the mouse leaves the Panel this will allow you to control how much time passes before it minimizes. The Panel will start the time count once the mouse is no longer over it. It will appear again when the mouse is passed over the portion of the Panel that remains visible. This time is measured in milliseconds.
[Auto hide] Size (pixels) — This determines the number of pixels that show when a Panel is minimized, for any Panel which is set to hide automatically. To maximize the Panel, the pointer must enter the Panel area.
Buttons Tab
In this section, you can set the appearance of the various types of buttons: launcher buttons, menu buttons, drawer buttons, and special buttons(such as the Logout Button and the Lock Button).
Button Type — Select the type of button you wish to configure.
Tiles enabled — This checkbox will enable background tiles for buttons of the given type on the Panel.
Normal tile — This shows the image used for the tile in the up position (inactive, not pressed). To choose another image file, just click on the image, and it will launch the icon browser. Tiles must be enabled to access this option.
Clicked tile — This shows the image used for the tile in the down position (active, pressed). To choose another image file, just press on the image, and it will launch the icon browser. Tiles must be enabled to access this option.
Border width (tile only) — This determines the width of the border around an icon. For example, if you set border width equal to 5, this will ensure that at least 5 pixels of the tile will be shown on every side of the icon; if necessary, the icon will be cropped. This is very useful if you have an icon that would normally cover up a tile. Tiles must be enabled to access this option.
Depth (displacement when pressed) — This determines the depth an icon will displace when pressed. Tiles must be enabled to access this option.
This tab also contains 3 options which affect all types of buttons simultaneously:
Make buttons flush with panel edge — This allows you to align the button with the edge of the Panel. If this option is not set then the border width setting is obeyed. By default this option is off.
Show button tiles only when cursor is over the button — If this option is enabled, the tiles will only appear when mouse cursor is over the button.
Prelight buttons on mouseover — Choosing this option will make the buttons brighten up when the mouse cursor is over them.
Panel objects Tab
This tab shows some options related to the placement and moving of objects on the Panel.
Default movement mode — Here you can choose the default mode for moving objects on the Panel. Possible variants are
Switched — When the object you are moving hits another object, they switch places.
Free — When the object you are moving hits another object, it "jumps" over it, so no other object is disturbed. This is a convenient option if you like the current arrangement of objects on your Panel and want to leave the other objects in place.
Push — The object you are moving pushes all other objects in front of it, like a snow plow.
You can override the default movement mode by dragging an object while holding Ctrl (for switched movement), Alt (for free movement), or Shift (for push movement) button pressed.
Padding — This changes the amount of space (padding) between objects on the Panel. It is measured in pixels.
Menu Tab
In this tab, you can set the options determining the appearance of Panel menus.
Use large icons — This will use large icons (rather than the default size) in menus. This is only practical for those with high resolution screens (1280x1024 and higher).
Show [...] buttons — This will add small buttons labelled by three dots (...) to all the items of the Main Menu. Clicking on such a button with the left mouse button will bring the pop-up menu for this item, i.e. the same menu which you get by clicking on the menu item with the right mouse button.
Show popup menus outside of panels — When this button is on, it allows pop-up menus to appear away from the Panel. When toggled off, the pop-ups will appear over the Panel. This can be useful on smaller screens or cluttered desktops.
Keep menus in memory — This will keep your menus in memory so that they do not rescan for added items. This can increase the speed of GNOME, but may also result in you missing new items added to your menu.
Global menu — This allows you to configure the Global Menu which you get by right-clicking on a Panel, or by using the keyboard shortcut. For each of the possible submenus (Programs, Favorites, etc.), you can choose whether it should be included as a part of the Global Menu, as a submenu, or not included at all. A description of these submenus is given in the section called Components of the Main Menu.
Miscellaneous Tab
The Miscellaneous tab contains options for various customizable behavior that didn't fit anywhere else.
Tooltips enabled — This option defines whether GNOME should show a tooltip when the pointer pauses on a Panel item.
Close drawer if a launcher inside it is pressed — By default drawers will remain open when you select an item within one. This can be annoying as the drawer will remain open until you close it with a mouse click. With this option selected drawers will close automatically when you select any item within one.
Raise panels on mouse-over — If you are using a window manager that is not GNOME compliant it will not understand its relationship with the Panel. This can cause your Panel to be covered by applications. If you enable this feature you can have the Panel automatically raise when your mouse is over it.
Keep panel below windows — If you are using a GNOME compliant window manager, the window manager will understand its relationship with the Panel. If you choose this feature the window manager and GNOME will allow applications to appear over the Panel. This can be useful on smaller screens.
Confirm removal of panels with a dialog — If this option is enabled, GNOME will ask for confirmation before removing a Panel.
This tab also allows you to configure some global key bindings. You can define key bindings for the Global Menu(ie. Popup Menu) and for the Run Program dialog. (The default key bindings for these are Alt+F1 and Alt+F2 respectively.) To change these key bindings, select a key from the drop-down list or press the Grab key… button and then press the desired key.
 | Using the Menu and Window keys | |
|---|---|---|
You should be able to use the special Menu and Windows keys for keybindings. If you have problems with using these keys, the most probable reason is that your X server was incorrectly configured: the keyboard type chosen during installation does not match your actual keyboard. If you are using XFree86 server, you can fix it by manually editing the configuration file. This file, named XF86Config, is usually located in the /etc or /etc/X11 directory. Open this file with any text editor (not a word-processor!) and find the line containing the word XkbModel. Change it to read
|
 | Use Caution When Editing XF86Config |
|---|---|
Making a mistake while editing the XF86Config file can make your keyboard or screen unusable in X Windows. Before editing this file, you should make a backup copy of it and make sure you know how to restore it from the backup file without using X Windows or GNOME, i.e., from a terminal. If you don't know how to do this, then do not edit this file. |
| <<< Previous | Home | Next >>> |
| Creating, Moving, and Removing Panels | Up | Individual Panel Properties |