Whole document tree
| GNOME 1.4 User's Guide | ||
|---|---|---|
| <<< Previous | GNOME Applets | Next >>> |
Multimedia Applets
CD Player Applet
CD Player Applet, shown in Figure 42, allows you to play CD's from a Panel. To add this applet to a Panel, right-click on the Panel and choose Panel->Add to panel->Applet->Multimedia->CD Player.

Usage
This applet is used to unobtrusively play and control CD's while you get real work done or play FreeCell. To use it, just press the small buttons in the applet like you would on any CD player.
Right-clicking on the applet brings up a menu containing the following items:
Run CD Player… — starts the GNOME CD Player, which has more features than the CD Player Applet such as automatically downloading CD track information from a CDDB server, volume control, and title/track display.
Help — displays this document.
About… — shows basic information about CD Player Applet, inluding the applet's version and the author's name.
Known Bugs and Limitations
This applet has no known bugs.
Authors
CD Player Applet was written by Tim Gerla (<timg@means.net>). Please send all comments, suggestions, and bug reports to the GNOME bug tracking database. (Instructions for submitting bug reports can be found on-line. If you are using GNOME 1.1 or later, you can also use Bug Report Tool (bug-buddy), available in the Utilities submenu of Main Menu, for submitting bug reports.
This manual was written by Chris Lyttle (<chris@wilddev.net>). Please send all comments and suggestions regarding this manual to the GNOME Documentation Project by sending an email to <docs@gnome.org>. You can also submit comments online by using the GNOME Documentation Status Table.
Mixer Applet
Mixer applet, shown in Figure 43, provides a simple and convenient interface for controlling the sound volume and launching the Audio Mixer. To add this applet to a Panel, right-click on the Panel and choose Panel->Add to panel->Applet->Multimedia->Mixer.

Usage
To adjust the volume, slide the volume bar up (louder) or down (quieter). To mute (or un-mute) the volume, press the speaker icon at the bottom of the applet.
Right-clicking on the applet brings up a menu containing the following items:
Run Audio Mixer… — starts the Gmix Audio Mixer application. The contents of this audio mixer will vary, depending upon the capabilities of your sound card. However, it typically allows you to control the volume level of the different sound input devices, such as the CD player, microphone, and line.
Help — displays this document.
About… — shows basic information about Mixer applet, inluding the applet's version and the author's name.
 | Note About Sound in GNOME |
|---|---|
For sound to work in GNOME, you must have sound enabled in the Control Center. To configure sound, click on the Main Menu button (the foot icon) and select Programs->Setting->Multimedia->Sound. Make sure both sound options are enabled in the General tab. Feel free to configure and test things in the Sound Events section. Note that you may have to exit GNOME and restart for sound to work properly after enabling it in the Control Center for the first time. |
Known Bugs and Limitations
This applet has no known bugs.
Authors
Mixer applet was written by Michael Fulbright (<msf@redhat.com>). Please send all comments, suggestions, and bug reports to the GNOME bug tracking database. (Instructions for submitting bug reports can be found on-line. If you are using GNOME 1.1 or later, you can also use Bug Report Tool (bug-buddy), available in the Utilities submenu of Main Menu, for submitting bug reports.
This manual was written by Dan Mueth (<d-mueth@uchicago.edu>). Please send all comments and suggestions regarding this manual to the GNOME Documentation Project by sending an email to <docs@gnome.org>. You can also submit comments online by using the GNOME Documentation Status Table.
Sound Monitor Applet
Sound Monitor applet, shown in its default theme (appearance) in Figure 44, is a sound volume display and an interface for controlling ESD (the Enlightened Sound Daemon) -- GNOME component responsible for sound output. To add this applet to a Panel, right-click on the Panel and choose Panel->Add to panel->Applet->Multimedia->Sound Monitor.

Sound in GNOME
GNOME uses a special program, called ESD (the Enlightened Sound Daemon), as an intermediary between applications and sound card. ESD allows mixing sound from several applications, so that you can play a game and hear the sound effects while listening to an aduio CD. To hear any sound from GNOME applications, ESD must be running. Normally GNOME is configured so that ESD is started every time you login; if for some reason this is not so, click on the Main Menu button (the foot icon) and select Programs->Setting->Multimedia->Sound and make sure that the option Enable sound server startup is enabled, so that the next time you login, ESD will be started. You can also start or stop ESD using the Sound Monitor applet as described below.
Non-GNOME applications usually are not aware of ESD and need full control of the audio card --- they can not share audio card with other applications. This means with such applications, you can either have sound from GNOME or sound from non-GNOME application, but not both. In many cases, this means that you have to temporarily stop ESD to get sound from non-GNOME applications (otherwise, you get error messages like Device /dev/dsp busy).
Usage
Sound Monitor always displays the volume of sound being produced on your system graphically. You may control sound by turning ESD on or off by right-clicking on the applet and selecting Place Esound in standby or Resume Esound respectively, as described below.
Right-clicking on the applet brings up a menu containing the following items:
Manager… — brings up the Sound Monitor Manager dialog, which allows you to view and control current ESD settings.
Place Esound in standby/Resume Esound/Start Esound — At any time, you will only have one of these three items, depending on whether ESD is running and what its status is. The first two menu items allow you to temporarily place ESD in standby and then resume ESD. This is useful if you have a sound application which is unable to work with ESD, but needs direct access to the sound device. The third allows you to start Esound if it is not started.
Properties… — opens the Properties dialog.
Help — displays this document.
About… — shows basic information about Sound Monitor, inluding the applet's version and the author's name.
Customization
You can customize Sound Monitor applet by right-clicking on it and choosing Properties…. This will open the Properties dialog (shown in Figure 45), which allows you to change various settings.
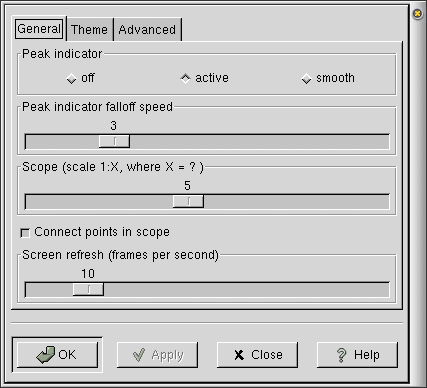
The properties in the General tab are:
Peak indicator — This controls the behavior of the peak indicator (the bright line which tracks the peak volume), either turning it off (off), having it follow the peak as if it is floating on top (active), or having it follow the peak smoothing out short spikes and drops (smooth).
Peak indicator falloff speed — This controls the speed the peak indicator falls back to zero volume (for active mode) or moves toward the current volume (for smooth mode).
Scope (scale 1:X, where X=?) — This controls the horizontal (time) axis scale for Sound Monitor "scope-like" themes, i.e., themes that show a graph of sound level, with time along the horizontal axis. (Since the default theme is not a scope, this control does not do anything until you have modified the theme, as described below.) A value of 1 corresponds to time scale of 44 100 pixels/second; value of X gives 44 100/X pixels/second. (These numbers appear because the standard for CD-quality audio stipulates that there should be 44 100 sound samplings per second.)
Connect points in scope — This determines whether the sampled volume points are connected. (For scope themes only.)
Screen refresh (frames per second) — This controls the number of times the Sound Monitor display is updated each second.
The properties in the Theme tab are:
Theme file (directory) — This is the theme for you Sound Monitor, which determines the overall appearance of the applet. You can either select a theme from the list Themes:, or else type in the directory and name of another theme if available. Some of the standard themes are shown in Figure 46.

The properties in the Advanced tab are:
ESD host to monitor — This option allows you to listen to sound being played by ESD on another computer. To do so, enter the network address (or IP address) of a computer to monitor in the format host:port. The host specified must be running ESD and have their esound daemon "unlocked" to allow other machines to connect. Note that the default port for ESD is 5001. Leave this entry blank to monitor sound on the local machine.
After you have made all the changes you want, click on OK to apply the changes and close the Properties dialog. To cancel the changes and return to previous values, click the Cancel button.
The Sound Monitor Manager
To start the Sound Monitor Manager, right-click on the applet and choose Manager…. This will open the Sound Monitor - Manager dialog (shown in Figure 47), which allows you to view and modify various ESD settings.
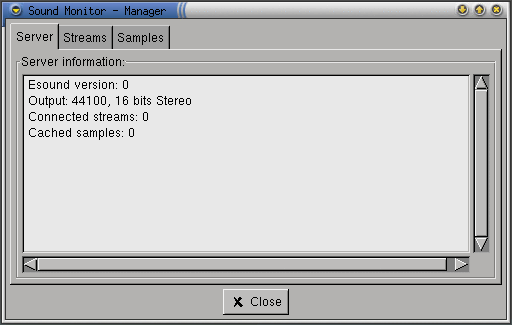
The Server tab displays the following information:
Server information — This is a brief description of the esound server daemon's current status, including the sound output rate to the sound card, the number of currently playing sounds (connected streams), and the number of sound samples cached in the server.
The properties in the Streams tab are:
Connected Streams — This displays a list of basic information for the current sound streams playing through the sound server. The user can adjust the volume and balance of a stream by first selecting the stream's line, then adjusting the volume and balance sliders.
The properties in the Samples tab are:
Cached Samples — This displays a list of basic information for the current sounds cached in the sound server. The user can adjust the volume and balance of a cached sound by first selecting the sound's line, then adjusting the volume and balance sliders. To toggle between displaying the sound's length as bytes or time (format MM:SS.S) click on the length or time column heading.
After you made all the choices you want, click on OK to make the changes and close the Properties dialog. To cancel the changes and return to previous values, click the Cancel button.
The Esound Persistent Volume Daemon (ESDPVD)
The Sound Monitor applet comes with a companion program called the Esound Persistent Volume Daemon (ESDPVD), which can run in the background and remembers the volume and balance of each stream that connects to the sound server. The main purpose of ESDPVD is to be used in conjunction with the Sound Monitor applet's Manager dialog to retain volume levels for individual streams that connect to the ESD sound server.
As an example, suppose you are running the GTCD CD Player and you lower its volume using the Manager window. Normally the volume setting will be lost when the program (in this case GTCD) is exited and restarted. However, if esdpvd is running and you start GTCD again, the volume will be restored to its previous (in this case, lower) value from before.
If you configure GNOME to start ESDPVD each time GNOME is started (using the control-center's Startup Programs section), ESDPVD will remember sound volume and balance customizations between GNOME sessions.
ESDPVD also remembers volume and balance adjustments to cached samples (often used for interface sound events such as button clicks, menus, etc.).
Known Bugs and Limitations
This applet only shows the sound volume for sound produced by GNOME applications (to be precise, sounds passing through ESD); it will not show sound volume for applications that directly connect to audio card.
Authors
Sound Monitor was written by John Ellis (<johne@bellatlantic.net>). Please send all comments, suggestions, and bug reports to the GNOME bug tracking database. (Instructions for submitting bug reports can be found on-line. You can also use Bug Report Tool (bug-buddy), available in the Utilities submenu of Main Menu, for submitting bug reports.
This manual was written by Dan Mueth (<d-mueth@uchicago.edu>) and John Ellis (<johne@bellatlantic.net>). Please send all comments and suggestions regarding this manual to the GNOME Documentation Project by sending an email to <docs@gnome.org>. You can also submit comments online by using the GNOME Documentation Status Table.
| <<< Previous | Home | Next >>> |
| Monitor Applets | Up | Network Applets |