Whole document tree
| GNOME 1.4 User's Guide | ||
|---|---|---|
| <<< Previous | The GNOME Panel | Next >>> |
Panel Basics
Using the GNOME Panel is very simple and will come easily to anyone who has used a graphical desktop environment. This section will give you a basic introduction to help you get started, and the following sections will discuss the various Panel objects and features in more detail.
Introduction to Panel Objects
A Panel can hold several types of objects. The example Panel in Figure 1 shows each type of Panel object.

This example Panel contains the following objects:
Menus. Menus are lists of items, each of which either starts an application, executes a command, or is a submenu. In the example Panel in Figure 1 , the left-most icon after the arrow is a stylized footprint icon (the GNOME logo). This is the Main Menu, one of the most important objects in the Panel. This menu provides access to almost all the applications, commands, and configuration options available in GNOME. The Main Menu is described in detail in the section called The Main Menu. The second icon shown is a folder, the default icon used for user menus. GNOME allows users to create their own menus with personalized contents to use in addition to the Main Menu. To open a menu, just click on the icon with the left mouse button. For more information on menus, see the section called Menus.
Launchers. Launchers are buttons which either start an application or execute a command when you press them (click with the left mouse button). The third icon in the example Panel is a launcher which starts the Gnumeric spreadsheet. For more information on launchers, see the section called Launchers.
Applets. Applets are applications which run inside a small part of the Panel. The fourth through eighth icons in the example Panel are applets. The first applet shown is the GNOME Weather applet, which periodically downloads the current weather conditions off the Web and displays the information. The second applet shown is the Drive Mount applet, which shows whether a disk (in this case, the floppy drive) is mounted and allows you to mount and unmount the drive with a single click of the mouse. The third applet shown is the Quick Launch applet, which acts as a container for launchers, but saves more space than placing your launchers directly on the Panel. In the example shown the Quick Launch applet contains six application launchers. Next is the GNOME Desk Guide, which allows you to control multiple virtual desktops, each of which can have multiple screens. You can move between desktops and screens by clicking with your left mouse button. The final applet shown is the Tasklist, which allows you to control your application windows in various ways, including changing the focus, iconifying windows, closing windows, and killing applications. The Tasklist shown is for a screen with only two windows, both of which are Electric Eyes. For more information on applets, see the section called Applets.
Drawers. Drawers are essentially extensions of a Panel which can be opened or closed. They can hold anything the Panel can. The brown icon of a drawer in the example Panel is the default icon for drawers, although any icon can be used. Click on the Drawer icon with the left mouse button to open or close it. For more information on drawers, see the section called Drawers.
Special Objects. Special objects are items you can add to a Panel which perform functions which are generally not available through the other Panel objects. The last item in the example Panel is a special object called the Logout Button. Pressing this with the left mouse button begins the logout sequence to end your GNOME session. For more information on special objects, see the section called Special Panel Objects.
Each of these object types is described in detail in the following sections. You can easily add, move, or remove Panel objects (see the section called Adding, Moving, and Removing Panel Objects).
Right-Click Menu
Clicking on any Panel object with the right mouse button brings up the Panel object's right-click menu. This menu contains Remove from panel for removing the object from the Panel, Move for moving objects within the Panel or between two Panels, the Panel submenu described below, and typically one or more object-specific menu items. For drawers, menus, and launchers the only object-specific item is Properties... which allows you to customize the properties and settings of the object. For applets, the right-click menu will often contain About... for viewing information about the applet such as the author's name and the applet version, Help for viewing the applet's documentation, and Properties... for configuring preferences and settings for the applet. Applets often have other applet-specific controls in their right-click menus.
The Panel submenu allows you to create and remove Panels and add objects to the Panel. It also allows you to modify the properties of the particular Panel of interest using the Properties menu item (see the section called Individual Panel Properties) or the properties of all Panels using the Global Preferences... menu item (see the section called Global Panel Preferences).
You can also right-click on the Panel itself. This will bring up the Main Menu. In particular, this menu also contains the Panel submenu described above.
Hiding the Panel
The left and right arrow icons seen at either end of the example Panel and in Figure 2 are used to hide the Panel.

Pressing one of these arrows will hide the Panel by sliding it in the direction of the arrow pressed, so that the only part of the Panel which remains visible is the Hide button itself. Pressing it a second time will expand the Panel.
Panels can be configured to automatically hide when you are not using it and reappear when you move the mouse to the part of the screen where the Panel resides. This can be useful if you are unable to run your system in a high resolution. To learn how to have a Panel auto-hide, see the section called Individual Panel Properties.
Logging Out
To log out of GNOME, right click on the Panel and select Log out. This will bring up the Logout dialog, shown in Figure 3.
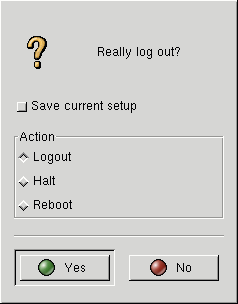
If you would like to save your current setup, select the Save current setup checkbox. This will save any GNOME applications you have open and configuration changes you may have made in the Control Center.
The default way to log out is by using the Logout option, which ends your GNOME session but does not shut down the computer. Depending on your system configuration, you may also have the Halt option, which shuts down the computer, and the Reboot option, which will reboot the computer.
 | Note for advanced users |
|---|---|
The Halt and Reboot choices will only be shown if you have permission to execute the command /usr/bin/shutdown. |
If you do not want to log out, press the No button and you will be returned to your GNOME session. Otherwise press the Yes button to log out.
| Logging Out and Window Managers |
|---|---|
If you are running a window manager that is GNOME compliant, the logout feature will quit the window manager as well as GNOME. If you are running a non-compliant window manager you will have to quit the window manager yourself. |
You can disable the Logout dialog so that selecting the Log out menu item will end your GNOME session without asking any questions. To do so, start the GNOME Control Center by selecting Main Menu->Settings->Startup programs and uncheck the Prompt on logout button.
Locking the Screen
Sometimes you may want to leave your computer with GNOME running and not allow others to use or view your GNOME session. GNOME allows you to do this by locking the screen, requiring a password to unlock it. To lock your GNOME session, right click on either end of a Panel and select Lock screen. Alternately, if you have the Lock Button(see the section called The Lock Button) on a Panel, you may just press this button to lock the screen. To unlock the screen, just type your login password.
| Screensavers and the Lock Button |
|---|---|
The Lock screen button uses a feature of the xscreensaver program. This is the same program that the Control Center uses to set your screensaver. In order for the Lock screen button to work properly, you must have a screensaver enabled in the Control Center. |
| <<< Previous | Home | Next >>> |
| The GNOME Panel | Up | The Main Menu |